Time to take on a new technique. Today I’ve had a crack at HDR – or High Dynamic Range.
Now before I go on, I’ll address those groans. HDR is a technique that seems to split the photographic community.
Put simply, HDR is compiled by taking a photo of the same scene or object a number of times, with different shutter speeds and settings. The photos are then blended, taking the best parts of each image to create the final ensemble.
The outcome is an image that has greater definition in the low-light and high-light areas, whereas a single photo may not be able to capture both light ‘extremes’.
It’s not uncommon for HDR photo’s to exaggerate the effects in the final image, which lends to a surreal outlook – and the reason many photographers don’t favour HDR. Here are some HDR examples from Flickr.
So I thought – why the heck not. Let’s give this HDR a shot.
The taking of photo’s for HDR is referred to as “Bracketing”, a feature that some camera’s support natively, but my Canon 550D doesn’t. Back to my firmware ‘addition’ Magic Lantern, which I introduced to my camera a couple of weeks ago doing my star trails.
You could bracket the shots manually by selecting the settings, but having a mini-computer do it for you is always preferable.
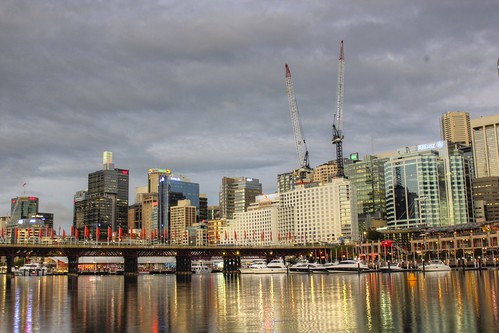
The photo above was taken during my Meetup photography walk. I observed another member (“Camerateer”) taking photo’s for HDR which gave me the initial idea. Thankfully in Magic Lantern the setting for HDR Bracketing is next to the Intervalometer, so I knew where to look!
I captured 4 images, about 1.5 seconds each, right on dusk. I downloaded them from my card and didn’t look at the again for days.
So on to the final step in HDR processing, which is to install some software on your PC or Mac. So off I went a-Googling.
To cut a long story short, all roads led to Photomatix Pro 5. Every person you speak to, or article on the internet all seem to end up at Photomatix Pro 5. I downloaded the software, loaded up my 4 bracketed photos and was staggered (in a good way) with the outcomes.
I thought it would be tricker, especially to reach a desirable outcome, but I couldn’t have been more wrong.
For balance (and a cheap alternative) I tried demo’s of other apps, only to be largely disappointed. Functionality, lack of features and the GUI were all pretty cumbersome.
So back to Photomatix it is – and a special mention for Aperture users on MacOS – the plug-in for Aperture makes the bracketing process so very, very easy right within Aperture. Just select the photo’s to bracket, grab the plug-in and away you go.
Just like many other photographic apps, Photomatix also comes with a large range of presets, so you can quickly and easy dial in a final look and feel. The image above is done with a series of manual tweaks, I was more inclined to give the final outcome a more personally tuned outcome.
Personally I love the clarity of the neon lights and the colour of the buildings, and the foreground reflections. It’s interesting studying the 4 source images in retrospect.
